
Step 1 – Concept and Original Model Creation
When people ask how are bronze sculptures made, they usually picture glowing metal and big furnaces. In reality, every great bronze starts quietly—with a clear idea and a strong original model. If this first step is weak, no amount of foundry magic can fix it later.
From Idea to Sketch
Most bronze sculpture ideas begin in a sketchbook or on a tablet:
- Artists gather references: live models, photos, props, or 3D scans.
- Quick thumbnail sketches lock in gesture, mood, and main silhouette.
- More refined drawings establish proportion, anatomy, and key details.
At our studio, we encourage clients and artists to spend real time here. A good sketch saves expensive corrections later in clay, wax, or metal.
Clay, Wax, or Digital Original
The next move is to build the original model—the master that all molds and castings will follow:
- Clay sculpture: Most common for figurative bronzes; easy to add, subtract, and refine.
- Wax sculpture: Used when artists like working directly in the same material that will later become the wax positive sculpture.
- 3D software: ZBrush, Blender, or similar tools let you sculpt digitally with incredible precision.
Each material has a slightly different feel, but the goal is the same: a clean, resolved form that reads clearly from all angles.
Maquettes for Pose and Proportion
Before jumping to full size, many sculptors create a maquette—a small, rough version of the final piece:
- Tests pose and gesture without a huge time investment.
- Confirms proportions, especially for complex figures or groups.
- Helps evaluate balance and stability, so the final bronze feels grounded, not awkward or top-heavy.
Collectors often love maquette-size bronzes; in the U.S. market, these smaller works are a popular entry point into fine art bronze.
Armatures: The Hidden Skeleton
Under almost every serious clay or wax figure is an armature—a hidden support system:
- Made from steel rod, aluminum wire, or pipe, anchored to a base.
- Holds the pose and prevents sagging as more clay or wax is added.
- Lets the artist work aggressively without worrying about the piece collapsing.
A well-built armature for clay sculpture is like a good blueprint in architecture. It doesn’t show in the finished bronze, but it determines how stable and accurate the form can be.
3D Scanning and 3D Printing for Enlargements
Modern bronze sculpture techniques often mix traditional hand modeling with digital tools:
- Artists may sculpt a smaller original, then use 3D scanning to capture it in high resolution.
- The digital file is scaled up to the desired size in CAD software.
- Large sections are 3D printed in resin or foam, then refined by hand in clay or wax.
We use this approach when a client wants a 10-foot public sculpture based on a 16-inch studio piece. It keeps proportions accurate and reduces guesswork in the enlargement process.
How Detail in the Original Model Affects the Final Bronze
Everything that appears in the final bronze starts here. If it doesn’t exist in the original model, it will not magically appear later:
- Fine textures (skin pores, fabric, hair, tool marks) must be present in the clay, wax, or 3D print.
- Edges and transitions need to be clear and intentional; soft, mushy forms tend to get softer in casting.
- Clean surfaces matter, because every fingerprint and scratch can show up in metal.
In short: the original model is the DNA of the finished bronze. When we guide artists and collectors through how bronze sculptures are made, this is the step we insist on getting right, because every mold, every pour, and every patina that follows can only reproduce what was first created here.
Step 2 – Creating the Mold for a Bronze Sculpture
Once I’m happy with the original model, I lock in the shape by making a professional mold. This is what lets me turn one sculpture into a real bronze edition, not just a one-off.
Silicone Rubber vs. Polyurethane Molds
For fine art bronze, I almost always choose between silicone rubber and polyurethane rubber:
| Mold Type | Pros | Cons | Best Use |
|---|---|---|---|
| Silicone rubber | Captures ultra-fine detail, stable, easy release, great for complex forms | Higher cost than polyurethane | Museum-quality, detailed bronzes |
| Polyurethane | Cheaper, tough, good for simple shapes | Can stick to some materials, less stable over time | Simple, larger, less detailed work |
In the U.S. market, collectors expect sharp detail and clean surfaces, so for most lost-wax bronze sculpture projects I treat silicone rubber molds as the standard.
How the Flexible Rubber Mold Captures Detail
The flexible rubber mold is brushed or poured directly over the original model:
- It picks up skin pores, fabric texture, tool marks—everything.
- Flexibility lets it peel off without tearing tiny details.
- The better the rubber mold, the better the wax positive sculpture and, in turn, the final bronze.
This is one of the biggest reasons fine art bronzes look so crisp compared to mass-market decor pieces.
Building the Rigid “Mother Mold”
Rubber alone is too soft to hold shape, so I lock it in with a rigid “mother mold” made of:
- Plaster bandage – good for small and medium pieces.
- Fiberglass – stronger and lighter, ideal for larger or more complex sculptures.
The mother mold does one job: keep the flexible rubber in exactly the same position every time, so every wax copy comes out consistent.
Mold Seams and Keys: Keeping Everything Aligned
Because most sculptures need multi-part molds, I plan the mold layout like a puzzle:
- Seams run along less visible or less detailed areas.
- Registration keys (little bumps and sockets) are built into the rubber and mother mold so parts snap into perfect position.
- Good key design prevents:
- Misaligned halves
- Warped forms
- Extra cleanup on every wax
This is where a lot of “cheap” molds fail—and where professional bronze foundries earn their money.
One-of-a-Kind vs. Limited Edition Molds
Not every bronze sculpture mold is built with the same goals:
- One-of-a-kind (unique) bronze
- Mold may be simpler and not designed for high repetition.
- Sometimes destroyed after a single casting for exclusivity.
- Limited edition bronze
- Mold is built to withstand dozens or even hundreds of wax pulls.
- Extra time invested in seam placement, thickness, and reinforcement.
- Key for consistent quality across the entire limited edition bronze run.
If you’re collecting or commissioning, this is a major factor in both price and long-term value. I cover more of this mindset in my breakdown of how modern bronze sculptures are made and improved over time.
How Many Wax Copies Can One Mold Make?
A well-made professional rubber mold in a fine art bronze foundry can typically produce:
- Silicone mold: about 30–80 clean wax copies before quality starts to drop.
- Polyurethane mold: often 15–40 wax copies, depending on design and handling.
Key factors that affect mold life:
- Depth of undercuts and complexity
- How hot the wax is during casting
- How carefully the foundry de-molds each wax
For serious U.S. collectors who care about museum-quality bronze sculpture, this is why genuine limited editions are tightly numbered and supported with a certificate of authenticity—you’re not just paying for metal, you’re paying for a professional mold and a controlled edition, not endless reproductions.
Step 3 – Wax Positive Casting and Wax Chasing
If you’re asking how are bronze sculptures made in a professional foundry, this wax stage is where the real precision work kicks in. The wax positive is a temporary copy, but it controls almost everything about the final bronze.
Pouring Hot Wax Into the Mold
We start by making a wax positive sculpture from the rubber mold:
- Hot casting wax is poured or “slushed” into the mold, then rotated so it coats the inside evenly.
- For hollow pieces, we pour out the extra wax after a short set time, leaving a shell.
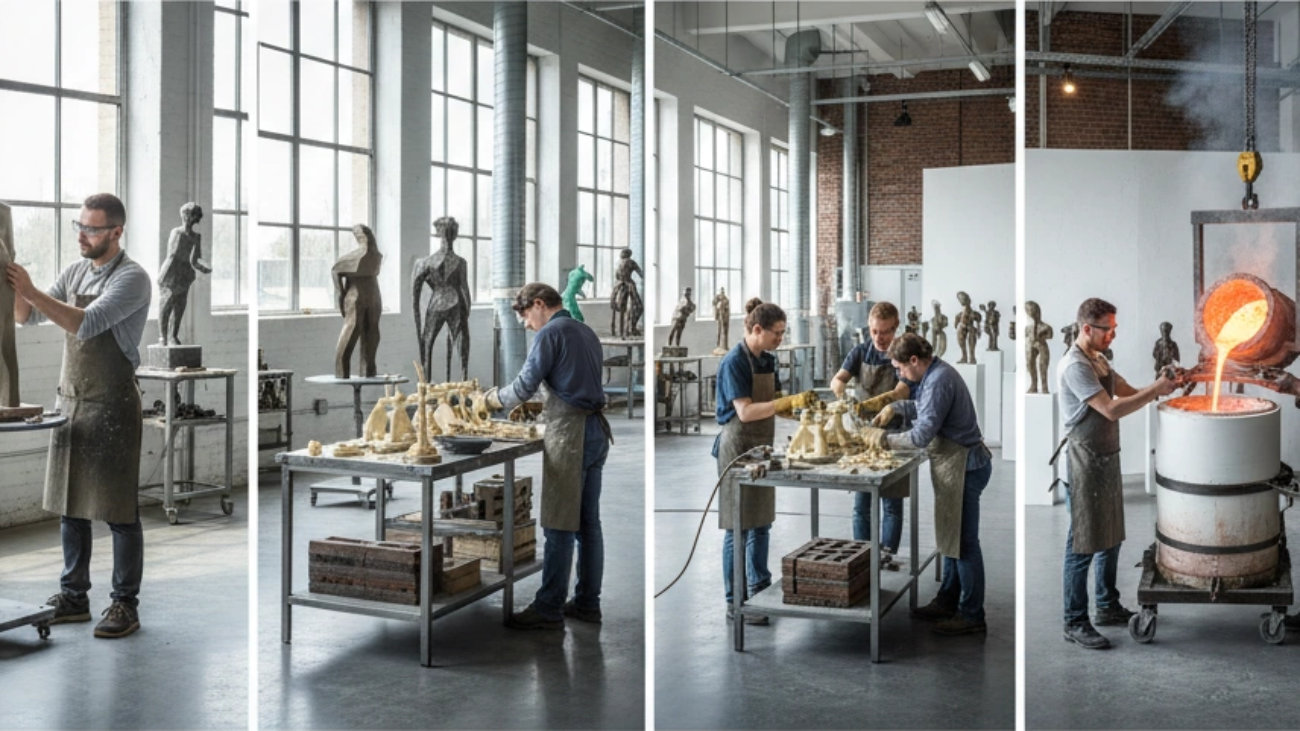
- In a modern setup like our new casting workshop (modern bronze casting line), we keep wax temperature and timing tightly controlled for consistency across an edition.
Controlling Wax Thickness
Wax thickness decides strength, weight, and how well the metal fills:
- Thicker wax = heavier, stronger bronze, but higher metal and shipping cost.
- Thinner wax = lighter bronze, but needs careful control to avoid weak spots.
- For most fine art bronzes, we target a consistent shell, usually around a few millimeters thick, checked with calipers and light.
Removing and Cleaning the Wax Positive
Once the wax sets:
- The mold is opened carefully so we don’t stretch or tear small details.
- We trim flashing and seam lines where the mold parts met.
- Wax chasing starts here: we use warm tools to smooth seams, repair pinholes, sharpen lines, and restore textures so the surface is clean before casting.
Adding Sprues, Gates, and Vents
To prepare for the lost wax casting process:
- We attach wax sprues, gates, and vents to create a “wax tree” that controls how bronze will flow and air will escape.
- Sprues feed metal into thick areas; vents pull gases out of thin, detailed sections.
- This wax plumbing is one of the key bronze sculpture techniques that prevents misruns, shrinkage pits, and trapped air.
Final Wax Inspection and Approval
Before we move into investment casting bronze:
- Every inch of the wax is checked under good light for dents, scratches, or soft detail.
- Any flaws are chased by hand until the artist (or our studio lead) signs off.
- Only after this final approval does the wax positive go forward—because whatever is in the wax will be locked into the lost wax bronze sculpture forever.
Step 4 – Investment: Building the Ceramic Shell or Plaster Mold

When people ask how are bronze sculptures made, the investment stage is where the lost wax casting process turns a fragile wax positive into a high‑temperature mold that can handle molten metal.
What “investment casting” means in bronze sculpture
In bronze sculpture, investment casting (also called the cire perdue method) means surrounding the wax positive sculpture with a heat‑resistant material—ceramic or plaster—so the wax can later be melted out and replaced with bronze.
- The invested mold must capture every pore, wrinkle, and tool mark.
- It also has to withstand extreme heat without cracking, so we can pour at full bronze melting temperature.
If you’ve ever toured a professional bronze casting foundry, like our own bronze sculpture foundry where art and metalworking meet, this is the stage where every wax is “suited up” for fire.
Ceramic shell casting: dipping the wax tree
Once the wax positive is fully wax‑chased and sprued, we build a ceramic shell around it:
- We mount the piece onto a central wax cup to form a wax tree.
- We dip the entire wax tree into a liquid ceramic slurry.
- While it’s still wet, we coat it with very fine sand (stucco).
- We repeat this process, adding 7–12 layers, starting with very fine material for detail, then coarser layers for strength.
Key points for ceramic shell casting:
- The first coats are all about capturing crisp detail.
- Later coats add thickness and strength so the shell can handle thermal shock when hot bronze hits.
- Proper shell thickness helps manage metal flow and reduce casting defects.
Ceramic shell vs. plaster investment molds
Foundries use either ceramic shell investment or more traditional plaster block molds (plaster investment mold):
- Ceramic shell investment
- Lighter, stronger, and more heat‑resistant.
- Excellent for fine art bronzes and complex shapes.
- Better for managing metal flow and reducing gas defects.
- Plaster block molds
- Thick, solid blocks of plaster around the wax.
- Heavier and slower to dry.
- Still used for certain shapes or studio setups, but less common in modern fine art production.
For most U.S. clients who expect museum‑level detail and consistent editions, I rely on ceramic shell investment casting bronze because it delivers cleaner surfaces and fewer surprises.
Drying times and humidity control
Every ceramic shell layer must dry fully before the next coat:
- Typical dry time per coat: several hours, often overnight in a busy shop.
- Humidity and temperature matter. High humidity slows drying, which can push schedules back and increase risk of shell defects.
- We use controlled drying rooms and good airflow to keep shells strong and predictable.
This is one reason timelines for bronze sculpture production can stretch; rushing shell drying is an easy way to ruin a casting.
Burnout and dewaxing in the kiln
Once the ceramic shell (or plaster mold) is fully built and dry, we move to burnout and dewaxing:
- The shells go into a kiln and are gradually heated to around 1,200–1,400°F (650–760°C).
- The wax inside melts, drains, and burns away—this is the heart of the lost wax casting process.
- What’s left is a clean, perfect negative cavity of the original wax positive sculpture, including all the sprues and vents.
We then keep the shell hot and prepped for pour so it doesn’t crack from thermal shock. At this point, the wax is gone for good, and the mold is ready to receive molten bronze that will eventually become a finished art piece, like the work you’ll see in our copper and bronze sculpture collection.
Step 5 – Bronze Alloy Melting and Pouring
When people ask how are bronze sculptures made, this is the intense part—turning the design into real metal. In our foundry, we treat this stage like a controlled science experiment.
Bronze Alloy Composition
Most fine art bronzes use a copper–tin–silicon alloy:
- Typical mix: about 90–95% copper, with tin, silicon, and sometimes small amounts of zinc or manganese
- This copper–tin bronze alloy is strong, resists corrosion, and holds fine detail better than softer metals
This is why serious collectors prefer art bronze over cheaper metals when they invest in pieces like our timeless elegance of art bronze sculpture.
Why Bronze Instead of Brass or Aluminum
For sculpture, bronze wins over brass or aluminum because:
- It flows better into tiny details during the bronze casting process
- It’s denser and feels more substantial in the hand
- It weathers outdoors more predictably, forming a stable patina
- It has a classic, warm tone that collectors associate with museum-quality bronze sculpture
Bronze Melting Temperature and Furnaces
To cast a lost wax bronze sculpture, we heat the alloy to a bronze melting temperature of around:
- 2,000°F / 1,100°C in a crucible furnace
Modern foundries typically use:
- Gas-fired furnaces – common, reliable, and cost-effective
- Induction furnaces – precise temperature control, popular in high-end fine art bronze foundries
Safety During Foundry Bronze Pouring
Pouring molten bronze is serious work, so we run it like a tight crew:
- Full safety gear: face shields, leather coats, aprons, heat-resistant gloves, and boots
- Dedicated roles: one person controls the furnace, one steers the crucible, one guides the pour, one spots for hazards
- Clear commands and hand signals so nobody guesses what’s happening next
How Molten Bronze Is Poured
Once the ceramic shell casting or investment mold is preheated, the team moves fast:
- The crucible is lifted from the furnace and transferred to a pouring shank
- Workers carefully tilt the crucible, letting molten bronze flow in a steady stream into the hot mold
- Vents and sprues (designed earlier) let gases escape and metal fill every detail
This “from crucible to mold” moment is where investment casting bronze turns the wax design into metal reality.
Cooling Time and Metal Shrinkage
After pouring, the mold rests and cools:
- Cooling can take from minutes to hours, depending on the size and thickness
- Bronze naturally shrinks slightly as it cools, so we design the wax and molds with that shrinkage in mind
- Foundry teams adjust wall thickness and gating to control how the metal feeds and solidifies, reducing internal stress and defects
Done right, this step gives you a solid, clean casting that’s ready for chasing, welding, and finishing—the foundation of a long-lasting handmade bronze statue that can live outdoors for decades.
Step 6 – Breakout, Metal Chasing, and Assembly
Once the bronze has cooled, this is where the real “sculpting in metal” starts. If you’ve ever wondered how bronze sculptures look so clean and refined, this is the step that makes it happen.
Breaking the Ceramic Shell (Breakout)
After pouring, the bronze is locked inside a rock‑hard ceramic shell or plaster investment. Foundry techs:
- Use hammers, air chisels, and sometimes sandblasting to break the ceramic shell off the cooled bronze
- Work carefully around delicate areas like fingers, folds, and thin edges
- Remove all remaining ceramic dust so it doesn’t interfere with welding or patina later
What comes out at this point is a rough bronze casting that still has a “tree” of metal channels attached.
Cutting Off Sprues, Gates, and Vents
Those channels that carried molten metal into the artwork now have to go:
- Sprues, gates, and vents are cut off with saws, cut‑off wheels, or torches
- The foundry leaves a bit of extra metal at cut points to avoid gouging the sculpture
- Larger feed points may be prepped for welding if multiple sections need to be joined
This is where the sculpture starts to look like the final piece, but the surface is still rough.
Grinding, Sanding, and Blending
Next comes cleanup:
- Grinding tools smooth down the stubs where sprues and vents were removed
- Sanding and flap wheels help blend those areas into the surrounding bronze
- The goal is: no visible seams, cut marks, or “scars” from the casting system
Done right, you can’t tell where the metal flowed in or where sections were joined.
Metal Chasing: Refining the Details
“Metal chasing” is basically sculpting all over again, but in bronze:
- Chasers use small carbide burs, rifflers, punches, and chasing tools
- They restore detail lost in casting or grinding: skin texture, hair, folds, tool marks
- They sharpen edges and re‑define lines so the bronze matches the original wax or clay
This step is what separates an average bronze from a true fine art piece. A good foundry puts serious time here.
Welding and Assembly for Larger Bronzes
Most medium and large bronze sculptures are cast in parts:
- Arms, legs, and complex forms are often cast separately for better quality and pour control
- Skilled TIG or MIG welders join these sections back together
- After welding, chasers blend the welds so the sculpture reads as one clean, continuous form
For very large or public artworks, we also engineer internal supports and mounting points, so the sculpture is structurally sound and safe long‑term.
Sandblasting Before Patina
Before color is added, the surface needs to be even and clean:
- Sandblasting (or glass bead blasting) removes oxide, oils, and minor surface residue
- It creates a uniform, slightly matte surface so patina chemicals bond evenly
- Any last flaws often show up at this stage and can be chased and corrected
By the time this step is done, the bronze is structurally complete, visually unified, and ready for patina and final finishing. If you’re planning a custom piece for your home or a public space, this is one of the reasons a well‑made bronze from a fine art foundry looks far more refined than mass‑produced metal decor or fiberglass pieces you might see in more commercial settings.
Step 7 – Patina, Color, and Surface Finishing
When people ask “how are bronze sculptures made?” this is the stage where the piece really comes to life. Patina is the controlled color and surface skin that forms on the bronze. It’s not just decoration—it’s a big part of the artwork’s mood, value, and how it will age outdoors in the U.S. climate.
What a bronze patina is and why it matters
A bronze patina is a thin, reactive layer created by applying chemicals and heat to the metal surface. I use patina to:
- Shape the personality of the piece (classic, contemporary, rugged, or refined)
- Highlight details in faces, drapery, and textures
- Help protect the metal when combined with a proper sealant
- Match or complement existing collections of fine art bronze at home or in public spaces
Common patina chemicals and colors
For a fine art lost wax bronze sculpture, I rely on proven chemical patina for bronze, including:
- Ferric nitrate patina – warm browns, reddish-browns, classic “museum” bronze look
- Cupric nitrate patina – greens and blue-greens, ideal for more dramatic or historic feels
- Liver of sulfur – deep browns to black, great for strong contrast and shadows
From these, I can build classic bronze patina colors:
- Rich browns and umbers
- Deep blacks and charcoal tones
- Natural greens and blue-greens (“verdigris”)
- Subtle gold and honey tones by lightly polishing high points
Hot patina vs. cold patina
There are two main bronze sculpture techniques for coloring:
- Hot patina
- The bronze is heated with a torch.
- Chemicals are brushed or sprayed on while the metal is hot.
- Produces durable, layered colors and is the standard in fine art bronze foundries.
- Cold patina
- Applied at room temperature.
- Better for subtle tints or touch-ups, but not as tough as hot patina on its own.
For most of my museum-quality bronze sculpture pieces, I use hot patina, sometimes finished with light cold patina accents for fine tuning.
Building color layers and sealing the bronze
To control the final look, I build color slowly:
- Heat the metal evenly with a torch
- Apply chemicals with brushes, sponges, or sprayers for smooth transitions
- Work in thin passes, cooling or reheating as needed
- Polish high points to expose warm metal and deepen contrast
Once the color is right, I seal the surface:
- Wax finish (microcrystalline or carnauba):
- Warm, natural sheen
- Easy to maintain with occasional rewaxing, especially for outdoor bronze maintenance
- Lacquer or clear coat:
- Harder shell, more resistant in harsh or coastal environments
- Often used under a wax layer for extra protection
This seal locks in the patina and helps control how the bronze reacts to rain, sun, snow, and pollution.
How patina affects outdoor bronzes over time
For outdoor pieces in the United States—whether on a private estate or a public plaza—the patina is the front line of defense. A well-done patina and seal:
- Slows unwanted corrosion and streaking
- Ages gracefully, developing character instead of random blotches
- Can be refreshed by a professional with light cleaning, rewaxing, and minor touch-ups
When I design and finish bronzes for collectors and public sites, I choose patina systems that balance beauty, long-term durability, and maintenance needs. You’ll see this level of finish on our curated bronze sculpture collection, where each piece is sealed and patinated for real-world display, not just the showroom.
How are bronze sculptures made – mounting, signing, and editions
When I finish a fine art bronze, this last step is all about stability, identity, and value. It’s where the sculpture becomes a finished collectible that can live in a home, office, garden, or gallery.
Bronze sculpture base options
The base sets the tone and keeps the piece safe. For most U.S. collectors, I match the base to how and where the bronze will be displayed:
- Marble or granite – best for a formal look, heavy and stable for mantels and pedestals
- Wood – warmer feel, great for interiors, usually hardwood like walnut or maple
- Steel – sleek, modern, and tough for contemporary spaces or outdoor use
The right base can make a solid bronze sculpture look timeless and upscale, which matters if you’re placing it in a high‑visibility room or corporate lobby.
Pinning and anchoring the bronze
To keep a bronze from tipping or shifting, I mechanically lock it to the base:
- Drill precise holes in both the sculpture and base
- Install stainless steel or brass pins into the bronze
- Use epoxy or mechanical fasteners (nuts and washers) underneath
This “pinning and anchoring” means you can move or ship the piece with confidence, which is critical for collectors and galleries across the country.
Cleaning, buffing, and final presentation
Before a bronze leaves my studio:
- I clean off dust, fingerprints, and polishing residue
- Buff the patina to bring out depth and color
- Apply a final coat of wax (or clear lacquer, if requested)
- Check the base feet or felt pads so it doesn’t scratch furniture
This is where the sculpture goes from “finished in the foundry” to “ready for a living room or museum pedestal.”
Signatures, stamps, and date marks
Every authentic art bronze needs a clear identity. I typically add:
- Artist signature – usually carved into the wax before casting or engraved afterward
- Foundry stamp or mark – shows which bronze casting foundry did the work
- Year or date code – ties the piece to a specific production period
These marks are a big part of how serious buyers answer the question “how are bronze sculptures made, and who really made this one?”
Limited edition bronze numbers
For limited editions, I mark the edition on the bronze itself, for example:
- 3/25 – the 3rd casting out of a total edition of 25
- 8/50 – the 8th casting in an edition of 50
- A/P – Artist’s Proof, usually a small number (often 10% of the edition)
- E.A. – Épreuve d’Artiste, the French term for Artist’s Proof
Clear bronze sculpture editions and numbering help protect value and prevent confusion in the resale market.
Certificates of authenticity for bronze
Along with the markings on the metal, I issue a Certificate of Authenticity (COA) for each limited edition bronze:
- Confirms the artist, title, dimensions, and bronze alloy
- Lists the edition size and your specific number (e.g., 3/25)
- States the foundry and casting method (lost‑wax, ceramic shell, etc.)
- Includes signatures from me (and sometimes the foundry)
For collectors who care about long‑term value and estate planning, this paperwork supports appraisal, insurance, and resale, tying directly into the role of bronze as art, money, and legacy.
Lost-wax casting vs sand casting for bronze sculptures
When people in the U.S. ask how bronze sculptures are made today, they’re usually talking about the lost-wax casting process (also called cire perdue). Sand casting is also used, but for very different reasons. Here’s how the two methods really compare if you care about detail, quality, and price.
How the lost-wax casting process works (cire perdue)
Lost-wax casting is the standard for fine art bronze sculptures because it captures every tiny mark the artist makes.
Basic lost-wax workflow:
- The artist makes a detailed original in clay, wax, or 3D print.
- A rubber mold is made from that original.
- A wax positive sculpture is created from the mold (a hollow wax copy).
- Sprues and vents are added and the wax is invested in a ceramic shell casting or plaster investment mold.
- The mold is heated; the wax melts out (that’s the “lost wax” part), leaving a perfect cavity.
- Molten bronze is poured into that cavity.
- Once cool, the shell is broken off, and the metal is chased, welded, sandblasted, and patinated.
This investment casting bronze method delivers:
- Extremely sharp detail (skin texture, fabric folds, tool marks)
- Clean surfaces that need less grinding
- Consistent results across a limited edition bronze run
If you’re looking for museum-quality bronze sculpture or handmade bronze statues for modern interiors or outdoor spaces, this is the process you want.
How sand casting works for bronze sculpture
Sand casting bronze uses compacted sand instead of ceramic shell or plaster investment. It’s a workhorse method when you need scale and volume more than micro-detail.
Basic sand casting workflow:
- A pattern (wood, foam, or metal) is pressed into special foundry sand to create a cavity.
- The pattern is removed, and molten bronze is poured directly into the sand mold.
- After cooling, the sand is broken away and reused for the next mold.
For large bronze statues, architectural bronze panels, hardware, and big public pieces, sand casting can be a smart move because:
- The molds are faster to make at large sizes.
- It handles structural, chunky shapes well.
- It’s practical for repeated industrial or architectural components.
But there’s a trade-off.
Detail and surface quality: lost-wax vs sand casting
If you care about detail level and surface quality, lost-wax wins, every time.
Lost-wax bronze sculpture:
- Captures pores, hair, subtle folds, and fine textures.
- Produces smoother, cleaner surfaces from the start.
- Gives artists and collectors that “high-end fine art bronze” look.
Sand casting bronze:
- Leaves a slightly grainy surface from the sand texture.
- Loses very fine detail and crisp edges.
- Requires more grinding and filling if you want a refined finish.
For gallery work, limited editions, and high-end collectors, sand casting usually doesn’t meet the standard unless the design is intentionally simple and blocky.
When foundries choose sand casting for big bronzes
A professional bronze casting foundry will usually choose sand casting when:
- The piece is very large (monumental statues, big reliefs, architectural elements).
- The design is bold and simple, not highly detailed.
- The budget is lower and the priority is “big and durable,” not “hyper-detailed.”
- They’re producing a lot of identical parts for construction or public spaces.
For example, if a city orders large architectural bronze elements or repeated panels for a building, sand casting might be the most efficient route, while one-of-a-kind or limited edition fine art bronzes for modern interiors are better suited to lost-wax casting.
Cost, speed, and edition size differences
Here’s how lost-wax vs sand casting generally compare in real-world projects in the U.S.:
Lost-wax casting (investment casting):
- Cost: Higher per piece, especially for small batches. You’re paying for mold making, wax chasing, ceramic shell layers, and fine finishing.
- Speed: Slower; each step—wax, shell building, dewax, casting, chasing—takes time.
- Edition size: Ideal for limited edition bronze runs (for example 25, 50, 75 pieces). The mold and setup cost is spread across the edition.
- Value: Higher perceived and resale value because of detail, craftsmanship, and collector expectations.
Sand casting:
- Cost: Usually lower per pound of bronze, especially for large, simple shapes or industrial orders.
- Speed: Faster to get big, repeatable castings out the door.
- Edition size: Good for large runs or repeated architectural elements, but not normally used for “fine art editions.”
- Value: More about function, scale, and durability than fine artistic detail.
If you’re comparing pricing on a 24-inch bronze, keep in mind that a true lost-wax hot cast bronze will cost more than a bulkier sand-cast piece, and both will be far more valuable and durable than any cold cast resin “bronze” imitation.
Which casting method is better for fine art bronzes in 2025?
For fine art bronzes in 2025, lost-wax casting is still the clear standard.
If you want:
- High detail and clean surfaces
- Classic bronze patina colors (browns, blacks, greens, golds) that show off the texture
- Strong long-term value and collector confidence
- Authentic fine art bronze that will age well outdoors
…you go with lost-wax bronze sculpture through a serious art bronze foundry.
Sand casting has its place—especially for monuments, architectural bronze, and large, simplified forms—but it’s not the go-to for premium art editions.
If you’re exploring modern bronze sculptures for interiors or outdoor spaces, and you care about originality and finish, it’s worth looking at curated, one-of-a-kind pieces, like the contemporary works we create at Art Vision Sculptures, where we pair handcrafted lost-wax casting with modern design for one-of-a-kind bronze and metal sculptures for modern spaces: unique bronze and metal sculptures for contemporary interiors and exteriors.
How Long It Takes to Make a Bronze Sculpture
When people ask me how bronze sculptures are made, the next question is usually: “How long does this actually take?” The honest answer: real, hot-cast bronze is not fast. For a serious, fine art piece, you’re looking at 8–20 weeks from first model to finished patina, sometimes more for very complex work.
Timeline for a Small Bronze Sculpture (Maquette Size)
For a small maquette (around 8–18 inches), a typical production window in a professional bronze casting foundry looks like this:
- Modeling the original: 1–3 weeks
- Mold-making: 1–2 weeks
- Wax work (wax positives + wax chasing): 1–2 weeks
- Investment and casting (ceramic shell + bronze pour): 2–4 weeks
- Metal chasing, welding, and sandblasting: 1–3 weeks
- Patina and final finishing: 1–2 weeks
That’s how we realistically land in the 8–12 week range for a small, single bronze or the first piece from a limited edition.
How Size, Complexity, and Edition Size Change the Timeline
A 10-inch tabletop bronze and a 7-foot outdoor sculpture are not in the same universe timewise. A few factors drive the schedule:
- Size
- Larger bronzes need more wax sections, thicker ceramic shell, and more time in the kiln.
- Big sculptures are often cast in multiple pieces, then welded together and chased, which adds weeks.
- Complexity of form
- Intricate textures, undercuts, and detailed faces/hands slow down wax chasing and metal chasing.
- Complex internal structures or dynamic poses can require more engineering and test pours.
- Edition size
- Once the mold is made, casting the rest of a limited edition bronze (say 25 pieces) is faster per piece.
- Foundries often run multiple waxes and shells in batches, but you’re still limited by furnace capacity and staff.
In the U.S. market, for a 24-inch fine art bronze with strong detail, a professional foundry schedule of 12–20 weeks is normal and frankly, a good sign that they’re not cutting corners.
Average Time for Each Major Stage
Here’s a practical breakdown you can expect when planning a commission or purchasing a new edition:
- Modeling & approval
- Clay, wax, or digital + 3D print: 1–4 weeks (depending on revisions and feedback).
- Mold-making (silicone + mother mold)
- Build, cure, cut, and test: 1–2 weeks.
- Wax positives & wax chasing
- Pulling wax copies, repairing seams, adding gates/vents: 1–3 weeks.
- Investment casting (ceramic shell or plaster investment)
- Dipping, stuccoing, drying, then dewax and firing: 2–4 weeks.
- Bronze casting & metal finishing
- Pouring, breakout, cutting, grinding, welding, metal chasing: 2–4 weeks.
- Patina & mounting
- Chemical patina, sealing, base mounting, final inspection: 1–2 weeks.
These ranges are for a serious fine art bronze, not a cheap “cold cast” resin piece. If something is promised in a couple of weeks, it’s almost never true hot-cast bronze.
How Weather and Drying Times Slow Down Ceramic Shell Investment
One thing most collectors in the U.S. don’t realize: weather matters. Ceramic shell investment is very sensitive to temperature and humidity.
- High humidity or cold weather slows down drying between shell layers.
- Foundries usually apply 7–12 coats of slurry and sand for each wax tree. Each coat must dry completely to avoid cracks or blowouts during casting.
- In damp or cold conditions, that drying can jump from a few hours to a full day per coat, stretching the investment stage from one week to several.
If your timeline is tight and the bronze casting foundry is in a humid region, build in extra time. It’s cheaper to wait than to risk a failed pour.
How Foundries Schedule Multiple Bronzes at Once
Professional bronze sculpture foundries in the States run like a small factory with an art brain:
- Batching by stage
- Multiple waxes are dipped together.
- Ceramic shell batches go through the dewax kiln and bronze pour together to maximize furnace efficiency.
- Dedicated teams
- One team handles wax chasing, another does investment, another focuses on metal work and patina.
- This keeps the line moving but also means there are natural bottlenecks during busy seasons.
- Prioritizing deadlines
- Commissioned pieces with fixed unveil dates (museums, public art, or outdoor bronze installations) may get priority.
- Edition pieces often follow a planned schedule so collectors know when their number in the edition will be cast.
This is why lead times for quality bronzes are measured in months, not days. If you’re planning a custom piece or an outdoor bronze for a property—like a long-term installation similar in spirit to site-specific outdoor bronze work—you should start the process well ahead of your target date.
Realistic Total Timeframe: 8–20 Weeks
To keep it simple:
- Small maquette (one-off or first in an edition):
- About 8–12 weeks in a professional fine art bronze foundry.
- Medium sculpture (18–30 inches):
- About 10–16 weeks, depending on detail and scheduling.
- Larger or complex pieces (over 30 inches, multi-part):
- About 14–20+ weeks, sometimes longer for big public or architectural bronzes.
If you’re commissioning or buying a new limited edition bronze sculpture in the U.S., planning for 2–4 months is smart. Anything faster usually means shortcuts in the lost-wax casting process, rushed patina, or a piece that isn’t actually hot-cast bronze at all.
Cost Breakdown of a Bronze Sculpture (U.S. Market)
When people see a price tag on a bronze, they often ask, “Why is it so expensive?” Let me break down where the money actually goes when you buy a fine art bronze sculpture in the United States.
Main Cost Drivers: Labor, Foundry Work, and Artist Fees
For real, hot-cast bronze sculptures, labor is the biggest cost:
- Artist fees
- Concept, modeling, revisions
- Oversight of mold, wax, metal chasing, and patina
- Royalties or per-piece fee on limited editions
- Foundry labor
- Mold-making technicians
- Wax casters and wax chasers
- Ceramic shell / plaster investment team
- Metal pour team and welders
- Metal chasing, sandblasting, and patina specialists
Every step is hands-on. A professional art bronze foundry in the U.S. is running skilled, specialized labor at solid wages, and that shows up in the final price.
How Mold-Making Costs Are Spread Across a Limited Edition
The first mold is where a huge chunk of up-front cost sits:
- Silicone rubber molds + fiberglass “mother mold”
- Expensive materials, time-consuming to build
- Skilled work to design proper seams and minimize distortion
- Cost spreading over an edition
- If the mold costs $3,000 and you only cast 5 bronzes, that’s $600 per piece just in mold cost
- If you cast 30 bronzes, mold cost per piece drops to $100
- Edition strategy
- Smaller edition = higher price per piece, more exclusivity
- Larger edition = lower cost per piece, more accessible pricing
This is why limited-edition bronze sculpture pricing can vary so much between artists and galleries.
Material Costs: Bronze Alloy, Investment, and Bases
The material side isn’t as big as labor, but it’s not small either:
- Bronze alloy
- Typical art bronze is a copper–tin–silicon alloy, made for strength and good casting
- Metal prices fluctuate with the copper market
- Larger, thicker sculptures can eat up a lot of metal weight
- Investment materials
- Ceramic shell slurry and silica sand
- Plaster or investment for alternative molds
- Wax for positives and sprues
- Bases
- Marble or granite bases cost more (cutting, polishing, drilling)
- Steel or hardwood bases also require fabrication and finishing
- Custom bases or architectural mounting hardware add more cost
Compared to something like painted stainless steel desktop sculptures, fine art bronzes carry heavier raw material and foundry investment costs, especially in thicker forms.
Patina, Finishing, and Mounting Costs
Fine art bronze isn’t finished when it comes out of the mold:
- Metal finishing
- Cutting and grinding sprues
- Welding multiple parts together
- Metal chasing: restoring details, smoothing transitions
- Patina work
- Chemical patinas (ferric nitrate, cupric nitrate, etc.)
- Multiple layers, heat, and hand application
- This is high-skill, time-intensive work that can’t be rushed
- Mounting
- Drilling, pinning, and anchoring to the base
- Leveling, stability checks, and safety considerations
Collectors pay more when the patina is museum-quality and handled by a top patina artist rather than a quick spray-and-go job.
Packaging, Crating, Insurance, and Shipping
Getting a bronze safely to your home or office is another real cost center:
- Custom crates
- Built to fit the sculpture + base
- Foam blocking, bracing, and vibration protection
- Insurance
- Coverage for damage or loss in transit
- Freight and handling
- Sculptures often ship by freight, not standard parcel
- Larger bronzes may require white-glove delivery or installation
These services matter, especially for collectors placing sculpture in high-end residential or commercial spaces alongside other fine art or statement pieces like premium stainless steel sculptures for interiors.
Why a 24-Inch Bronze Can Range from $4,000 to Over $25,000
A 24-inch bronze in the U.S. can land anywhere in that range depending on:
- Edition size
- Edition of 100 vs edition of 8 or 12
- Complexity
- Simple pose vs complex negative spaces, separate parts, and tricky casting
- Level of detail
- Smooth, stylized forms vs ultra-detailed textures and surfaces
- Artist reputation
- Emerging artist vs established name with a strong collector following
- Foundry quality
- Budget foundry vs top-tier fine art bronze foundry with impeccable QA
- Patina and finish
- Simple monochrome patina vs layered, custom, or experimental patinas
You’re not just paying for “a piece of metal” — you’re paying for design, rarity, craftsmanship, and the artist’s market value.
Commissioning a Custom Bronze vs Buying an Edition
Commissioning a custom bronze is almost always more expensive than buying a piece from an existing limited edition:
- Commissioned bronze
- You cover:
- All mold and setup costs (no cost sharing with other buyers)
- Artist design time, sketches, 3D work, and revisions
- Prototyping, possibly multiple maquettes
- Expect:
- Longer timeline
- More meetings and approvals
- A one-of-one or tiny edition with high exclusivity
- You cover:
- Buying from an edition
- Mold costs and development time are spread across all buyers
- You pay only for:
- Your casting
- Finishing
- Patina
- Base and shipping
- Much more cost-efficient if you care about the artwork, not custom design
In the U.S. market, a 24-inch custom commissioned bronze can easily start in the $12,000–$30,000+ range, depending on the artist and complexity, while a similar-sized piece from an existing edition might sit in the $4,000–$15,000 range.
If you’re deciding between commissioning versus buying an edition, think about what you value more: total control and uniqueness, or best value for museum-quality bronze work.
Key FAQs About How Bronze Sculptures Are Made
Is the lost-wax casting method still used for fine art bronzes today?
Yes. The traditional lost-wax casting process (cire perdue) is still the gold standard for fine art bronze in 2025. At my studio, every museum-quality bronze goes through a full investment casting bronze workflow: wax positive sculpture, ceramic shell casting, and hot metal pour. This method gives the best detail, consistency, and long-term durability.
Can bronze sculptures really stay outdoors for decades or centuries?
They can, if they’re cast and finished correctly. A true hot cast bronze with a solid copper-tin bronze alloy, proper patina, and regular outdoor bronze maintenance (gentle washing and rewaxing) can handle harsh U.S. climates for generations. Many historic monuments you see in American cities are proof of how durable art bronze really is.
What is the difference between hot cast bronze and cold cast resin “bronze”?
- Hot cast bronze:
- Real molten bronze alloy poured into a ceramic shell or plaster investment mold
- Heavy, ring-like-metal when tapped, weldable and restorable
- Used by fine art bronze foundries for investment casting bronze sculptures
- Cold cast “bronze”:
- Resin or plaster mixed with bronze powder, poured at room temperature
- Much lighter, chips more easily, and not considered a true bronze statue fabrication
- Good for decor, but not for serious collectors or outdoor use
If you want a long-term investment piece, always choose a genuine hot cast bronze like the ones we create through our bronze sculpture maker process.
How many copies are usually made in a limited edition bronze sculpture?
For fine art, a limited edition bronze often runs from 10 to 50 pieces, plus a few artist proofs (A/P) or Épreuve d’Artiste (E.A.). Each piece is hand-poured, chased, and patinated, so even within an edition, no two bronzes are 100% identical. Lower edition numbers usually mean higher value.
Why are some bronze sculptures much more expensive than others?
Price comes down to a few big factors:
- Size and complexity of the sculpture
- Hours of labor for mold-making, wax chasing, metal chasing, welding, and patina
- Foundry costs, bronze alloy composition, and base materials
- Reputation and demand for the artist
- Very small edition sizes or unique one-of-one works
A large, complex, museum-quality lost-wax bronze from a respected fine art bronze foundry will cost far more than a mass-produced decorative casting.
How to tell if a bronze sculpture is authentic and not a cheap reproduction?
Look for:
- Weight and feel: Real bronze feels heavy and solid for its size.
- Surface detail: Clean metal chasing, sharp lines, and rich bronze patina colors.
- Marks: Artist signature, foundry stamp, and clear edition number (for example, 3/25, 8/50, A/P).
- Paperwork: A proper certificate of authenticity bronze from the artist or foundry.
- Sound: Lightly tapping the piece should give a clear, metallic ring, not a dull plastic thud.
When in doubt, ask for the bronze casting process step by step from the seller. A reputable studio can explain exactly how their bronzes are made, from armature for clay sculpture through bronze melting temperature, pouring, patina, and final finishing.


Add a Comment