
Concept and Design: How Do You Make a Bronze Sculpture?
When people ask me how to make a bronze sculpture, I always start with this: a great bronze begins with a clear concept and a smart design process. If the idea is weak, the metal won’t save it. So before we ever touch clay or fire up a furnace, we do the real work here.
Define the idea and purpose
I first get brutally clear on why this bronze sculpture should exist.
I ask questions like:
- Is it a public monument, a garden statue, or a small collectible piece?
- Is the goal realistic portrait, stylized figure, or abstract form?
- Where will it live — outdoors in harsh weather or indoors in a quiet gallery?
- What emotion should it carry — strength, peace, movement, memory?
From that, I define:
- Main theme: e.g., “honoring veterans,” “celebrating movement,” “modern minimal form”
- Scale: tabletop, life-size, or monumental
- Viewing distance: close-up detail vs. read-from-afar silhouette
- Budget range and timeline: important for both private collectors and public projects
This concept becomes our roadmap. Every decision later — pose, patina, base, installation — needs to serve this purpose.
Research references, poses, and proportions
Even when I’m sculpting in a stylized way, I start with solid reference.
I typically gather:
- Anatomy references:
- Human or animal anatomy books
- High-resolution photos from all angles
- Pose references:
- Athletes, dancers, workers, historical figures
- Real people, photographed specifically for the project
- Context references:
- Existing monuments in similar locations
- Local cultural symbols or architecture
I pay special attention to:
- Proportions: classical, heroic, or stylized?
- Gesture: does the pose read clearly from a distance?
- Balance: will this figure feel stable and believable?
Good research prevents awkward anatomy, weak poses, and costly rework later.
Sketching views and thumbnails
Before I touch clay, I sketch. A lot.
I keep these sketches fast and loose:
- Tiny thumbnails to explore:
- Different poses and gestures
- Angles and viewpoints
- How the sculpture “reads” in silhouette
- Front, side, and back views to understand:
- Mass and balance
- Overlaps and negative space
- How the sculpture will look in the round
At this stage, I’m thinking:
- Can someone recognize the gesture from across a plaza?
- Does the form feel dynamic or static, and is that right for the concept?
- Are there any weak viewing angles that need redesign?
These sketches are cheap to change. Bronze is not.
Building a small clay maquette
Once the idea is solid on paper, I build a small clay maquette — basically a 3D sketch.
For the maquette, I:
- Use a simple wire armature for support
- Work in oil-based clay that stays workable
- Focus on:
- Big shapes, not tiny details
- Balance and weight distribution
- Silhouette from all sides
The maquette helps me test:
- How it feels in space — not just on a flat page
- Where the weight sits — will it need extra armature or a larger base?
- How light and shadow play across the forms
For large public or custom bronze sculptures, this maquette is usually the first physical model we show a client. It’s the perfect stage to get structural and aesthetic issues fixed early.
Collaborating with clients or stakeholders
For custom bronze sculpture projects — especially public works — collaboration is critical.
I walk clients through:
- Concept sketches and thumbnails
- The clay maquette, from all sides
- Scale references: showing how tall/large it will feel next to a person
We talk about:
- Facial expression and body language
- Symbolic elements (objects, clothing, cultural references)
- Placement and viewing angles in the final location
At this stage, we get:
- Feedback and approval before moving larger
- Clear notes on what must not change
- Any technical requirements (logos, plaques, inscriptions, city codes)
This keeps everyone aligned and avoids costly surprises during bronze casting and installation.
Using digital sculpting and 3D modeling
For many projects, I combine traditional sculpting with digital 3D modeling. Tools like ZBrush and Blender are incredibly useful in the design phase.
Digital sculpting helps me:
- Quickly test different poses and proportions
- Spin the model in 360° for full viewing angle checks
- Scale up or down precisely for tabletop or monumental sizes
- Add or remove elements without destroying a physical model
For complex or highly detailed pieces, I often:
- Start with a traditional clay maquette
- Scan it into 3D or rebuild it digitally
- Refine sharp details, textures, and structural elements in the software
Digital models are also perfect for showing clients realistic previews before we commit to bronze.
3D printing a prototype
Once the digital sculpture looks right, I often create a 3D printed prototype.
A printed prototype lets us:
- Hold the design in our hands
- Check fine details, surface textures, and transitions
- Test scale and proportions in a physical space
- Quickly tweak and reprint, if needed
We use 3D prints to:
- Present a clear physical model to clients for approval
- Plan sprue system design and mold strategy early
- Confirm that thin parts and overhangs will survive bronze casting
When the 3D printed prototype is approved, we’re ready to move forward with confidence. At this point, the concept and design are locked in, and every next step — from clay to wax to bronze — follows a clear, intentional plan.
Creating the Original Sculpture in Clay
Choosing the Right Clay for Bronze Sculpture
When I start a bronze sculpture, I always begin with the right clay. It affects every step that comes after.
Oil-based clay (plastiline):
- Best for detailed custom bronze sculpture work
- Doesn’t dry out, so I can work on it for weeks or months
- Great for complex figures, portraits, and large bronze statue making
Water-based clay:
- Cheaper and easy to shape
- Dries faster and needs regular misting/wrapping
- Works if you’re moving quickly and comfortable with timing
For most clay-to-bronze sculpture projects in a professional bronze casting foundry, I prefer oil-based clay because it holds detail and stays workable longer.
Building a Strong Armature
A solid armature is non‑negotiable. If the structure fails, the sculpture fails. I usually use:
- Steel or aluminum pipe/rod for the main support
- Heavy-gauge wire for limbs, hands, and smaller extensions
- Plywood base screwed to the armature for stability
Key points:
- Build it to match the pose and balance of the figure
- Make sure the center of gravity is over the base
- Leave room to add clay without making the sculpture too heavy
For large bronze sculpture destined for public spaces, I design the armature knowing it will later connect to a permanent base or mounting system.
Blocking in Basic Shapes
Before chasing details, I block in the “big picture”:
- Start with simple forms: cylinders for limbs, ovals for the head, boxes for the ribcage and pelvis
- Focus on massing—getting the weight, volume, and balance right
- Step back often and check the silhouette from a distance
This stage defines whether the bronze statue will feel solid and believable or stiff and awkward later.
Refining Anatomy, Gesture, and Silhouette
Once the main volumes are in, I refine:
- Gesture: the overall flow and energy of the pose
- Anatomy: muscle groups, bony landmarks, and proportions
- Silhouette: the outline from every main viewing angle
For US clients who expect high-end custom bronze sculpture work (public art, memorials, corporate commissions), I spend a lot of time here. A strong pose and clean silhouette read clearly from far away, especially on large outdoor bronze pieces like those in our large bronze sculpture collections.
Adding Texture, Detail, and Character
When the structure and anatomy are locked in, I start building personality:
- Facial features, fingers, hair, and clothing folds
- Skin texture, tool marks, and surface patterns
- Unique “story” details that match the client’s concept
I keep in mind that certain tiny details may soften slightly during the lost wax casting process, so I push important forms a bit sharper in clay.
Checking Symmetry and Viewing Angles
I never trust just one angle. I:
- Walk around the sculpture constantly
- Use a mirror or phone camera to spot symmetry issues
- Check key views: front, 3/4, side, and main sightlines the client will see
For figurative bronze sculpture, I also compare measurements (head height, limb length, shoulder width) to keep proportions believable.
Preparing the Clay for Mold Making
Before sending the piece to mold, I prepare the surface so it casts cleanly:
- Soften or reduce deep undercuts that might trap mold material
- Strengthen thin or fragile areas with extra clay or support
- Smooth transitions where needed so the mold can pull away
- Clean up loose bits of clay that could break off and cause defects
This is where I think like a foundry: if the mold can’t be made safely, the bronze can’t be cast safely. A well‑prepared clay original saves time and money later in the bronze sculpture step‑by‑step process, especially when working with professional bronze casting partners in the US or abroad.
3. Making the Mold for Bronze Casting
Why molds matter in the lost-wax casting process
If you want a clean, accurate bronze sculpture, the mold is non‑negotiable. In the lost-wax casting process, the mold is what:
- Captures every detail from your clay original
- Lets you create a wax version for casting
- Protects the sculpture while you work through multiple steps
A good mold means sharp details in bronze, fewer casting issues, and less rework in metal chasing later.
Choosing mold materials: silicone, plaster, fiberglass
For most custom bronze sculpture projects, I rely on a combo of flexible rubber and a rigid support shell:
- Silicone rubber – Best for detail. It picks up skin texture, tool marks, fabric folds, everything. Great for fine art and custom bronze sculpture work.
- Plaster – Inexpensive, easy to use, but weaker and heavier. Works for small, simple pieces.
- Fiberglass – Lightweight and very strong. Ideal for larger bronze statue making where the mother mold needs to handle weight and repeated use.
If I’m planning multiple editions or larger runs, I invest in a higher-grade silicone with a fiberglass shell so the mold holds up over time—similar to what professional art foundries use in their production. You can see how these methods carry through in a foundry setting in this breakdown of a bronze sculpture foundry process.
One-piece vs multi-part molds
How you split the mold depends on the sculpture’s shape and undercuts:
- One-piece flexible mold
- Works for simple shapes with no deep undercuts
- Fast, cost‑effective, great for basic forms
- Multi-part piece mold
- Used for complex poses, outstretched arms, deep folds, or openings
- Each section peels away without tearing details
- Essential for dynamic figures and large bronze statue making
I always think about how the mold will come off the clay before I start—if you can’t remove it cleanly, you’ll lose detail or break the original.
Planning clean seam lines
Seam lines are where the mold parts meet. Plan them—don’t guess:
- Run seams through less visible areas: back of legs, under arms, along clothing edges
- Avoid crossing faces, hands, and key focal points
- Use clay shims or parting walls to build clean boundaries
Smart seam planning saves hours of wax chasing later and gives you a cleaner bronze surface, especially on polished or patinated areas.
Using release agents the right way
To keep the mold from bonding to your clay model or to itself:
- Apply a thin, even layer of release agent (spray or brush-on)
- Avoid puddles—too much release can soften or blur detail
- Make sure every surface that will touch rubber or shell is coated
Done right, the mold lifts cleanly, and you don’t tear your silicone or drag clay.
Building a strong mother mold (support shell)
The flexible mold needs a rigid “exoskeleton” so it doesn’t warp:
- Use plaster bandage or fiberglass for strength
- Add registration keys so the shell and rubber lock together in the same position every time
- Make the shell thick enough to support weight but not so heavy that it’s hard to handle
For larger or outdoor-focused works, I treat the mother mold like hardware: if it fails, the entire clay-to-bronze sculpture workflow is at risk.
Demolding without damaging the clay original
Once the mother mold and rubber are cured, I carefully pull everything off the clay:
- Loosen edges gradually—never yank
- Remove the rigid shell first, then peel back the silicone layer by layer
- Watch fragile areas like fingers, ears, thin drapery, and small details
If the mold was planned right, the clay comes out in one piece, and you’re ready for a clean wax positive. If it wasn’t, you’ll see cracks, broken parts, and lost detail—so careful mold planning and demolding technique are key to a professional bronze statue making process.
Wax Positive – Creating the Wax Version of Your Bronze Sculpture
Once the mold is ready, I move into one of the most critical stages of the lost-wax casting process: creating a clean, accurate wax positive. This wax version becomes the direct blueprint for your final bronze, so how you handle this step directly affects the quality of the sculpture.
Pouring, Slushing, or Brushing Molten Wax
Depending on the size and detail of the sculpture, I’ll use one of three methods:
- Pouring – For simple shapes or thicker sections, I pour molten wax in, roll the mold to coat, then pour out the extra.
- Slushing – For hollow pieces, I rotate the mold while the wax sets, so it builds up an even layer inside.
- Brushing – For very detailed areas, I brush wax into the surface first to capture sharp textures and fine lines.
The goal is simple: get wax into every detail of the mold without trapping air or leaving thin, weak spots.
Controlling Wax Temperature and Viscosity
Wax control is non‑negotiable. If it’s too hot, you lose detail. Too cool, and it won’t flow into tight areas.
- I keep the wax in the ideal casting range (usually around 160–190°F / 70–88°C, depending on the wax formula).
- Thicker wax flows slower but builds up walls faster; thinner wax flows better into fine details.
- I always test a small area first to see how the wax behaves before committing to a full pour.
This temperature and viscosity control is what keeps details sharp and surfaces clean.
Getting an Even 4–6 mm Wall Thickness
For bronze sculpture, an even 4–6 mm (about 3/16″) wall thickness in the wax is the sweet spot: strong enough for casting, light enough to avoid metal problems.
To hit that:
- I build up the wax in several passes (multiple slush coats or pours).
- I check thickness with a simple gauge or by backlighting thin areas.
- Thin spots get extra wax; thick ridges get trimmed from the inside.
Consistent wall thickness helps the bronze cool evenly and reduces the risk of warping or casting defects.
Cooling and Pulling the Wax Positive from the Mold
Once the wax is built up:
- I let the mold cool slowly and evenly, so the wax doesn’t warp or crack.
- When it’s firm, I carefully open the mold and pull out the wax positive, supporting any delicate parts.
This first pull won’t be perfect—that’s normal. The next step is making it clean.
Wax Chasing: Fixing Seams and Imperfections
Wax chasing is where I clean up everything the mold process introduces:
- Removing seam lines where mold parts met
- Filling air bubbles, pinholes, and small dents
- Straightening edges and sharpening forms that softened slightly
I use heated metal tools, small spatulas, and brushes dipped in warm wax. The aim is to make the wax look like a finished sculpture, not a rough casting.
Re-Sculpting Fine Details in Wax
Some textures and crisp details need to be redefined:
- Re-cutting hair, fabric folds, or skin textures
- Sharpening eyes, lips, and edges
- Rebuilding any detail that lost definition in the molding steps
If you’re coming from a clay original, this stage is where I respect your intent—restoring that same character and gesture in the wax.
Adding Wax Sprues, Runners, Gates, and Vents
Next, I design the wax sprue system—the channels that will carry molten bronze in and air/gases out.
I add:
- Sprues – main wax rods that feed bronze into the sculpture
- Runners and gates – secondary channels to help direct flow into tricky areas
- Vents – thin wax channels that let air escape so metal doesn’t trap gas
This isn’t random; it’s engineered for smooth, efficient metal flow.
Designing the Sprue System for Clean, Even Casting
A good sprue system reduces defects and makes metal chasing easier later. When I design it, I’m thinking about:
- Even filling – metal reaches all parts at about the same time
- Gravity and flow – no dead zones where metal can swirl and create turbulence
- Shrinkage control – placing feeders where the metal wants to pull in as it cools
- Keeping sprues in places where they’re easy to cut off and chase in the final bronze
This is the last chance to engineer a clean bronze statue making process before we move toward investment and metal.
If you’re planning a large custom bronze sculpture or restoring older bronze work, the same level of precision applies in wax as in metal. For example, many of the same detailing principles show up later in repairing and restoring bronze sculptures, so I treat the wax positive as seriously as the final bronze.
5. Investment and Ceramic Shell Building (How Do You Make a Bronze Sculpture)
Once the wax is ready, the next big step in the lost wax casting process is investment and ceramic shell building. This is where we create the heat‑resistant mold that will hold molten bronze, so it has to be strong, stable, and clean inside.
What “investment” means in bronze casting
In bronze sculpture, investment is the refractory material (heat-resistant coating) that surrounds your wax positive and becomes the mold for the metal. It matters because:
- It has to hold its shape at 2,000°F+ (1100°C+).
- It must capture fine detail from your wax chasing work.
- It needs to let gases escape so you don’t get porosity and defects in the bronze.
If the investment fails, the casting fails. That’s why we treat this step as non‑negotiable, not optional.
Ceramic shell vs solid investment molds
For most custom bronze sculpture projects, we use ceramic shell investment because it’s strong, relatively lightweight, and great for detail. In general:
- Ceramic shell investment
- Built up in multiple thin layers
- Ideal for complex, detailed, or larger bronze statues
- Works very well with silicon bronze and statuary bronze alloys
- Solid investment molds (plaster/silica mixes)
- Thicker, heavier, more traditional
- Used more for smaller pieces, jewelry, or short runs
- Not as efficient for large outdoor bronze sculptures
For bigger outdoor pieces, like the kind you might see in parks, plazas, or luxury properties, ceramic shell is almost always the smarter move. If you’re considering a large outdoor piece to pair with stainless steel works, you can see how we approach durability and finish on our outdoor bronze-style sculptures for elegant spaces.
Dipping the wax model in ceramic slurry
To start the ceramic shell, we dip the wax positive into a ceramic slurry—a liquid mix of refractory materials designed to:
- Flow into fine textures and undercuts
- Dry into a hard, heat‑resistant layer
- Bond well to the following layers
The first coat (often called the prime coat) is the most critical. It captures all of the detail that will later show in your bronze sculpture.
Stuccoing with sand between coats
After each slurry dip, we stucco the wet surface with fine sand or refractory grain. This step:
- Adds thickness and strength to each layer
- Helps the shell build up faster and more evenly
- Improves the shell’s ability to handle thermal shock during burnout and bronze pouring
We repeat this “dip + stucco” cycle several times, letting each coat dry before moving on.
Applying 6–9 layers of ceramic shell
For most bronze sculpture step by step projects, we build 6–9 layers of ceramic shell, depending on:
- The size and weight of the sculpture
- The bronze alloy being used (silicon bronze, statuary bronze, etc.)
- How aggressive the pouring setup and temperatures will be
More layers mean a stronger mold, which reduces risk during burnout and pouring, especially for large custom bronze sculptures for U.S. clients who expect long‑term durability outdoors.
Drying time and environmental control
Each ceramic shell layer must fully dry before the next one goes on. To keep the shell from cracking or weakening, we:
- Control temperature, humidity, and airflow in the shell room
- Avoid fast, uneven drying that can cause stresses in the shell
- Give heavier pieces more time between layers
Rushing this step usually shows up later as shell failure or surface defects in the bronze.
Reinforcing fragile areas before burnout and pouring
Before we move to burnout, we check the ceramic shell for weak points, especially around:
- Thin arms, legs, or extended parts of the sculpture
- Sharp transitions or tight corners
- Sprue and vent junctions
We add extra shell layers or external supports to those areas so the mold can handle:
- The weight of the molten bronze
- Thermal shock at high bronze pouring temperature
- Handling, moving, and positioning at the foundry
This careful investment and ceramic shell building is what lets us confidently pour bronze and deliver clean, detailed castings—whether you need a one‑off custom bronze sculpture for a private home or multiple pieces for a public project.
6. Burnout – Losing the Wax and Hardening the Shell
Burnout is where the “lost wax casting process” really earns its name. This is the step that clears out the wax and locks in the final shape before you pour bronze, so control and safety matter a lot.
Setting the ceramic shell in the kiln
For a bronze sculpture, I always:
- Place the ceramic shell investment upside down in the kiln so the wax can drain out cleanly
- Support the shell securely with kiln furniture or sand so it doesn’t tip, shift, or crack under heat
- Keep enough space between shells so hot air circulates evenly
Ramping up to burnout temperature
You don’t rush heat with ceramic shell:
- Slowly ramp the temperature up to around 700–800°C (1300–1500°F)
- Use staged holds (soaks) at lower temperatures to let steam and gases escape
- Avoid sudden jumps in temperature that can cause shell cracking, especially on larger bronze statue molds
Losing the wax (the “lost wax” step)
As the kiln climbs:
- The wax melts and drains out of the shell, leaving a clean cavity for bronze
- A catch tray or sand bed under the shells collects the hot wax safely
- Any leftover wax residues are burned off at higher temperature, so the mold interior is as clean as possible
This clean cavity is crucial for a smooth, high-quality bronze pouring temperature later, whether you’re casting a small art piece or a large bronze statue like the ones we produce for residential and public installations.
Burning out residues and cleaning the mold interior
To get a sharp, detailed bronze sculpture:
- Hold at burnout temperature long enough to burn out all carbon and wax smoke
- Make sure no soot, ash, or charred material remains inside the shell
- A properly burned-out shell helps reduce gas defects and porosity in the bronze
Controlling heat to protect the shell
Ceramic shell is strong, but thermal shock will ruin it:
- Increase and decrease temperature gradually to avoid sudden expansion or contraction
- Keep the kiln environment consistent—no cold drafts, no rapid door openings
- For complex or thin sections, ramp even slower to protect delicate areas
If you’re working on bigger outdoor sculptures similar in scale to our large bronze statue projects, that careful temperature control becomes even more important.
Inspecting the fired shell before pouring bronze
Before any bronze alloy goes in, I always:
- Check the shell for cracks, chips, or thin spots
- Inspect the sprue system openings to be sure they’re clear and fully burned out
- Repair minor surface defects with refractory patch or reject badly damaged shells
A solid, fully burned-out ceramic shell is your last line of defense before molten bronze. If this step is done right, the actual pour runs smoother, the risk of shell failure drops, and the final bronze sculpture captures your clay and wax detail cleanly.
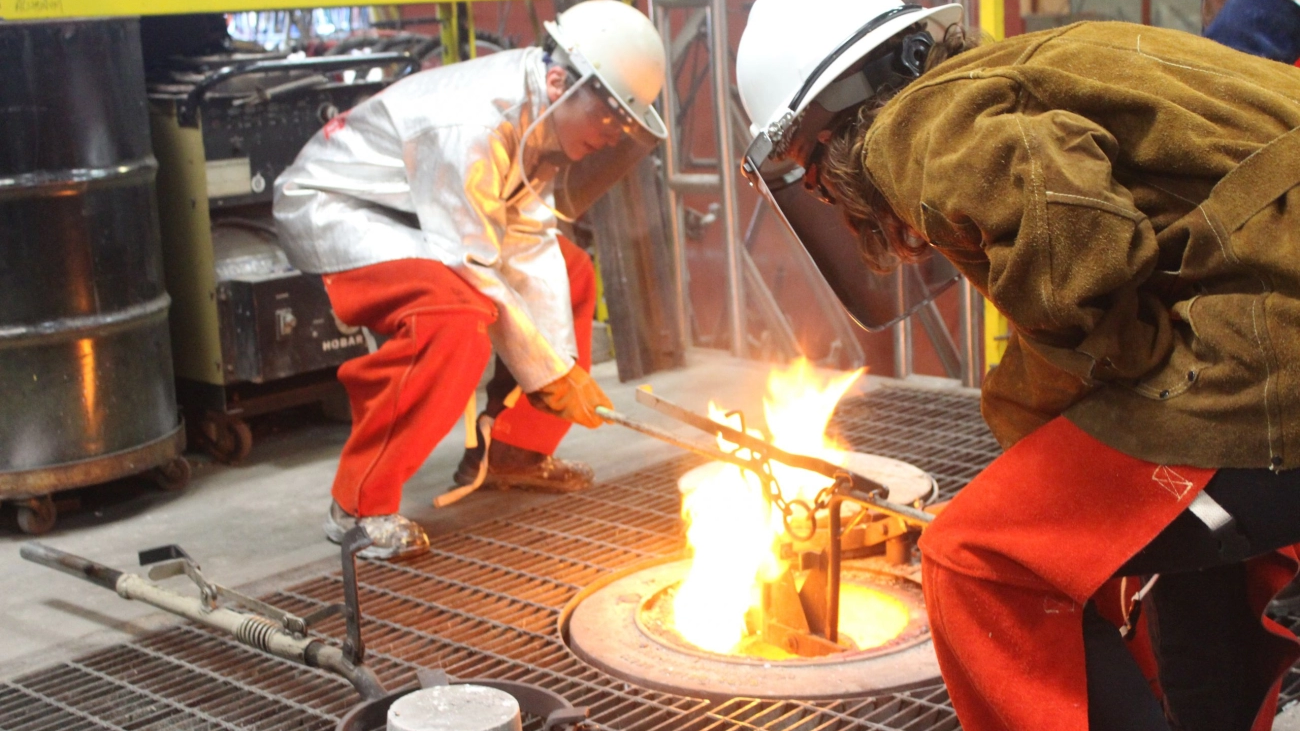
7. Melting and Pouring the Bronze
Once the shells are ready, it’s time for the part everyone thinks of first: actually melting and pouring the bronze. This step can make or break your bronze sculpture, so I treat it with zero shortcuts and strict safety.
Choosing the Right Bronze Alloy
For art casting, I mainly work with:
- Silicon bronze – Great fluidity, reliable for detailed lost wax casting, good corrosion resistance, and ideal for outdoor custom bronze sculptures.
- Statuary bronze – The classic sculpture alloy; slightly warmer color, very traditional look, and excellent for fine detail in clay-to-bronze sculpture work.
Which alloy I choose depends on:
- Indoor vs outdoor use
- Desired color and patina range
- Level of detail and wall thickness
Bronze Composition and Casting Behavior
Bronze isn’t just “bronze.” A small shift in composition changes how it behaves when poured. For example:
- Alloys with more silicon flow better into thin areas and complex sprue systems.
- Alloys with higher copper content tend to give a richer color but can be a bit trickier for very thin sections.
Understanding the alloy’s flow, shrinkage, and solidification lets me design the sprue system and gating strategy to reduce misruns and porosity.
Furnaces: Crucible vs Induction
In a professional bronze casting foundry, I use:
- Crucible furnaces – Fuel-fired (often gas), where the crucible is heated directly. Common, flexible, and cost-effective.
- Induction furnaces – Faster, very controllable, cleaner melt, and ideal for more precise temperature control and repeated pours.
Both are capable; the key is:
- Correct crucible size
- Clean melt (minimal slag and dross)
- Accurate temperature control
Correct Bronze Pouring Temperature
For sculpture alloys, I target a bronze pouring temperature of about 1100–1200°C (2000–2200°F). That range gives:
- Good fluidity for thin wax positive casting
- Reduced risk of cold shuts and misruns
- Less oxidation compared to overheating
I confirm with:
- Optical pyrometer or thermocouple readings
- Visual cues in the melt (surface motion, color, and slag behavior)
Metal Casting Safety Gear and Protocols
Handling molten bronze is no DIY shortcut zone. For every pour, we stick to strict safety:
Required safety gear:
- Leather or aluminized foundry coat and pants
- High-temp gloves and arm protection
- Full-face shield and safety glasses
- Steel-toe boots with metatarsal guards
- Cotton or wool underlayers (no synthetics that melt onto skin)
Basic protocols:
- Clear, dry floor around the pour area
- No water, damp tools, or wet investment near molten metal
- Dedicated pour team with assigned roles (pourers, spotters, support)
- Pre-pour safety check of all tongs, shanks, and lifting equipment
Preheating the Ceramic Shell
Before pouring, I preheat the ceramic shell molds so the bronze fills every detail instead of freezing too early.
- Typical preheat: 400–700°C (750–1300°F) depending on shell thickness and sculpture scale
- Benefits:
- Better metal flow
- Reduced turbulence
- Lower risk of misruns and cold shuts
The preheated shell is brought from the kiln to the pour area and set securely in sand or a support bed.
Pouring Techniques and Gating Strategy
A smooth, well-planned pour is everything. I design the sprue system in wax to control how metal enters the sculpture:
- Main sprue – Primary feed for the molten bronze
- Runners and gates – Direct bronze into the sculpture evenly
- Vents – Let air and gases escape quickly
During the pour itself:
- We pour in a steady, continuous stream, not stop-and-start
- For large bronze statues, I may use multiple pourers synchronized into one sprue system
- We pour into the heaviest sections first, letting gravity assist filling thinner areas
This reduces turbulence, air entrapment, and shrinkage defects.
Cooling and Solidification in the Ceramic Shell
After the pour, patience wins. I let the bronze:
- Sit and solidify fully inside the ceramic shell
- Cool at a controlled rate to reduce stress and cracking
Cooling time depends on:
- Alloy
- Wall thickness
- Sculpture size
Large pieces can stay in the shell for hours before I even think about breaking them out. That controlled cooling locks in detail and structural integrity, setting up the casting for clean chasing and finishing later.
If you want a deeper look at the traditional lost wax casting process and how it creates long-lasting, high-value bronze art, you can see a full breakdown in this overview of the lost-wax bronze sculpture craft.
Breaking the Shell and Cleaning the Casting (How Do You Make a Bronze Sculpture)
Once the bronze cools, it’s time to reveal the metal and see what the pour actually gave you. This step is all about patience, control, and careful cleanup so you don’t damage the sculpture you just worked so hard to cast.
Let the Bronze Cool Safely
I never rush this part. After pouring:
- The ceramic shell and bronze need to cool down to a safe handling temperature.
- For thicker or larger bronze sculptures, this can mean hours before I even think about touching the mold.
- Cooling too fast can cause internal stress or cracks in the metal, so controlled, natural cooling is the way to go.
Breaking the Ceramic Shell
When it’s cool enough, I start breaking the ceramic shell and exposing the bronze casting:
- I use hammers, chisels, and sometimes air tools to chip away the ceramic shell.
- I work from the strongest areas first and move toward delicate details.
- The goal is simple: remove the shell without gouging or denting the bronze underneath.
For complex or decorative work, like our own patina bronze bird sculptures, I take extra time around thin edges and fine textures.
Cutting Off Gates, Sprues, and Vents
Every bronze casting has extra metal where the molten bronze flowed in and out:
- I cut off gates, sprues, risers, and vents with cut-off wheels, saws, or torches.
- I leave a bit of extra material at the cut so I can grind it flush later during metal chasing.
- On large bronze statues, there can be dozens of these connections to remove.
Sandblasting and Cleaning the Surface
After the shell is off and the metal runners are removed, the surface still isn’t clean:
- I use sandblasting or shot blasting to remove any remaining investment, ceramic, and oxide scale.
- This step evens out the surface so I can clearly see the quality of the casting.
- A good blast gives a consistent, matte finish that’s ideal for the next stage of refinement.
Inspecting for Defects
Now I go over the raw bronze casting like a quality inspector:
- I look for misruns, shrinkage, porosity, cracks, or thin spots.
- I check key details: faces, hands, sharp edges, and any high-relief textures.
- If there are serious issues, I decide whether they can be fixed by welding and chasing or if a recast is necessary.
This inspection is critical if you’re producing high-end custom bronze sculptures for clients in the U.S., where consistency and long-term durability are non-negotiable. For a broader look at how we balance traditional techniques with modern cleanup methods, I cover more of that in our overview on making bronze sculptures with both old and new craft.
Sorting and Labeling Large Bronze Sections
For big bronze sculptures and public art installations, I rarely cast the piece in one solid pour:
- Each section (torso, arms, base, accessories, etc.) is sorted, labeled, and stored carefully.
- I mark alignment points and weld locations so assembly later is straightforward.
- Good labeling prevents mix-ups and speeds up welding, metal chasing, and final installation.
By the end of this stage, the sculpture has fully emerged from the shell. It’s still rough, but now it’s pure bronze, ready for detailed metal chasing, welding, and the patina work that gives it its final character.
9. Metal Chasing, Welding, and Surface Refinement
What Is Metal Chasing and Why It Matters
Metal chasing is where a bronze sculpture really starts to look like a finished artwork, not just a rough casting. In plain terms, chasing means:
- Cleaning up flaws left from casting
- Rebuilding sharp lines and textures
- Making all seams and welds disappear
If the chasing is sloppy, even a perfectly cast bronze will look cheap. If the chasing is clean and consistent, the piece looks sharp, intentional, and ready for a professional patina finish.
Grinding and Sanding Sprue Marks and Seams
Once the gates, sprues, and vents are cut off, I go straight into cleanup:
- Grind down sprue stubs with an angle grinder or die grinder
- Remove casting seams along parting lines and junctions
- Step through grits of abrasives (coarse → medium → fine) so the surface doesn’t get wavy or over-ground
The goal is a smooth, even surface that keeps the original form—no flat spots, no unwanted dips.
Rebuilding Edges, Texture, and Details in Metal
Casting can soften details, so I bring them back in metal:
- Re-cut sharp edges on folds, drapery, and geometry
- Re-define textures (skin, hair, fabric, stone, etc.) using punches, chisels, burrs, and small rotary tools
- Sharpen transitions between planes so light hits the sculpture the way it did in clay
I always keep reference photos of the clay or wax close by to match the original character and style.
TIG Welding Sections for Large Bronze Sculptures
For large or complex bronze sculptures, I usually cast in sections and then TIG weld them together:
- TIG welding bronze gives clean, controlled welds with less spatter
- Match the alloy for the filler rod to the base metal (silicon bronze or statuary bronze)
- Plan welds in low-visibility areas whenever possible—behind folds, under overhangs, or in natural breaks
Once welded, the joint becomes structurally solid, but visually it should disappear after chasing.
Hiding Welds and Matching Clay Texture
After welding, I blend everything until it looks like one continuous piece:
- Grind weld beads flush with the surrounding bronze
- Re-create the original surface using chisels, rotary tools, and texturing punches
- Blend direction of tool marks so they match the flow and gesture of the sculpture
The test is simple: if you can point out where the weld was, it’s not done yet.
Filling Pits and Fixing Casting Flaws
Minor casting issues are normal. I deal with them before patina:
- Fill pits and pinholes using bronze rod or brazing, then grind smooth
- Repair small voids or shrink spots with careful build-up and chasing
- Check for porosity and weak areas that could telegraph through the patina
I don’t move on to color until the metal surface is solid, clean, and stable.
Preparing the Bronze Surface for Patina
A good patina starts with a clean, consistent metal surface. For that, I:
- Degrease thoroughly (no oil, wax, or fingerprints)
- Even out the overall finish—from soft satin to a light tooth, depending on the patina style
- Lightly sand or blast where needed to unify sheen and remove any last contamination
Once chasing and refinement are done, the bronze is ready for patination, whether that’s a classic brown, dark statuary finish, or something more dramatic like a rich green similar to the tones used on our stunning patina brass statue.
A well-chased, well-prepped surface is the difference between a sculpture that looks “OK” and one that feels truly high-end, whether it’s a small custom piece or a large public artwork for modern spaces like those we design in our extra-large metal art projects.
10. Patination – Coloring and Sealing the Bronze
Understanding bronze patina and natural oxidation
Once the metal chasing is done, patination is where the bronze really comes to life. A bronze patina is simply controlled oxidation. Bronze naturally darkens and can turn green over time outdoors. With patina, we speed that process up and steer the color and texture instead of leaving it to chance.
A good patina does three things:
- Adds color and depth
- Highlights forms and textures
- Gives a layer of protection when sealed correctly
For clients in the U.S., I usually design the patina around where the sculpture will live (indoor vs outdoor, coastal vs dry climate) so the color ages in a predictable way.
Hot patina vs cold patina
There are two main methods most bronze foundries and professional studios use:
- Hot patina:
- The bronze is heated (usually with a torch) while chemicals are brushed, sprayed, or dabbed on.
- The heat activates the reaction quickly and allows stronger, deeper colors.
- Ideal for classic browns, blacks, and rich verdegris (green) effects.
- Very common for fine art bronzes and outdoor sculptures.
- Cold patina:
- Applied at room temperature, often with mild chemicals or dyes.
- Slower and more subtle; great for softer tones or when heat isn’t practical.
- More common on small pieces or where you want more control with less equipment.
For most custom bronze sculpture projects in the U.S., I recommend hot patina for durability and richer color, especially on public or outdoor work.
Common patina chemicals and colors
Patina chemicals react with the bronze surface to produce stable colors. Some of the most used tones:
- Brown:
- Liver of sulfur, ferric nitrate.
- Classic “museum bronze” look; works well on figurative pieces and memorials.
- Black:
- Sulfurated potash, cupric nitrate layered heavily.
- Great for strong silhouettes and modern design.
- Verdegris (green):
- Cupric nitrate, ammonium sulfide.
- Traditional green statue look, often seen on historic monuments.
- Gold / warm amber:
- Light ferric applications over a polished surface or under clear wax.
- Nice for contemporary and abstract sculptures.
We can also blend chemicals for unique tones, which is popular for modern pieces similar in spirit to our colorful painted stainless steel fish sculpture, but translated into bronze patina rather than paint.
Applying patina: heat, brushes, sprays, sponges
Application technique matters just as much as the chemistry:
- Heat:
- We usually warm the bronze until it just sizzles when touched with a wet brush.
- This helps the patina bond evenly and develop richer color.
- Brushes:
- Ideal for controlled placement and working details like faces, hands, or lettering.
- Sprays:
- Good for soft gradients and large surfaces on big statues.
- Sponges / rags:
- Perfect for mottled, stone-like, or aged effects, and for breaking up flat color.
On a custom bronze, I’ll often combine methods: spray a base, brush in shadows, then sponge highlights to keep the piece visually alive from every angle.
Layering patinas for depth and realism
The most convincing bronze sculpture patinas are layered, not “one and done.” Some common layering strategies:
- Dark base layer:
- Apply a dark brown or black first to push shadows into recesses.
- Wipe or buff raised areas to create contrast.
- Mid-tones:
- Add medium browns or greens on top to build volume.
- Highlights:
- Very light application or selective buffing to reveal warm metal at the high points.
- Spot effects:
- Slight verdegris around seams, folds, or textures where natural oxidation would settle.
Layering is key for memorials, portraits, and public art in the U.S., where people view the piece up close and notice every subtle shift in color.
Sealing and “freezing” the patina
Once the color is where we want it, we “freeze” it so it doesn’t keep reacting too quickly:
- Waxes:
- Clear or tinted microcrystalline or carnauba wax.
- Applied warm, then buffed.
- Gives a natural look and is easy to maintain.
- Lacquer sealers:
- Clear protective coatings sprayed or brushed on.
- More durable for high-touch or outdoor locations but less “soft” in appearance.
Indoors, a wax finish is usually enough. Outdoors, I often combine a lacquer base coat with wax on top for extra protection and easier touch-ups.
Matte, satin, or glossy finish options
Finish sheen changes the way light plays on the bronze:
- Matte:
- Low reflection, emphasizes form and texture.
- Great for serious memorials and traditional statuary.
- Satin:
- Soft sheen, the most popular choice for fine art bronzes.
- Balances detail, depth, and elegance.
- Glossy:
- High shine, emphasizes color and polished surfaces.
- Works well on contemporary or design-forward pieces and pairs nicely with modern materials like stainless steel, similar to our large modern painting stainless steel sculpture.
When I work with U.S. clients, I usually send photos or samples of the different sheens so we lock in the look before finishing.
Caring for patinated bronze outdoors vs indoors
Proper care is what keeps your bronze sculpture looking good for decades:
- Indoor care:
- Dust with a soft cloth or feather duster.
- Lightly wax every 1–2 years if needed.
- Avoid harsh cleaners, polishes, or scouring pads.
- Outdoor care:
- Rinse gently with clean water once or twice a year to remove dust and pollutants.
- Re-wax every 6–18 months depending on your climate (hot sun, snow, or ocean air will require more frequent care).
- If you see bright metal showing through or heavy spotting, it’s time for a professional touch-up.
In the U.S., especially in coastal regions or areas with heavy freeze-thaw cycles, I always suggest a regular maintenance schedule. With the right patina and simple care, a bronze sculpture will hold its color, protect its surface, and age gracefully for generations.
11. Mounting, Bases, and Installation for a Bronze Sculpture
Mounting and installation can make or break a bronze sculpture. In the U.S. especially, where pieces often go into public spaces, safety, durability, and clean presentation matter just as much as the artwork itself. Here’s how I handle mounting, bases, and installation step by step.
Plan Mounting Points Early
I plan mounting points during the design phase, not at the end. That way, the structure stays clean, safe, and invisible.
When I design a bronze sculpture, I:
- Build in hidden mounting points under feet, at the base of drapery, or inside the sculpture.
- Make sure the mounting locations line up with structural “strong zones” in the piece.
- Coordinate with the client or architect on final site conditions (concrete slab, landscaping, interior floor, etc.).
This planning keeps the sculpture secure and makes installation much faster on site.
Internal Stainless Steel Armatures and Anchors
Inside the bronze, I typically use stainless steel armatures and anchors to carry the load, especially for outdoor and large-scale work.
Why stainless steel:
- It’s corrosion-resistant, even in wet or coastal U.S. climates.
- It’s strong enough to support tall or cantilevered forms.
- It bonds well with epoxy and grout for secure mounting.
Common configurations:
- Vertical stainless rods running from the sculpture down into the base.
- Cross-bracing inside hollow bronze to prevent movement and fatigue.
- Threaded stainless anchors that bolt directly into embedded hardware in concrete or stone.
Choosing the Right Base Material
The base isn’t just decoration; it’s a structural element. I usually recommend:
- Stone (granite, marble, limestone)
- Best for outdoor bronze statues and civic work.
- Heavy, stable, weather-resistant, and timeless.
- Great when you want the feel of classic bronze monuments, like those discussed in this guide to planning durable bronze sculptures and pricing.
- Metal (stainless steel, bronze-clad, powder-coated steel)
- Sleek, modern, and good for contemporary spaces.
- Works well when sculptures tie into stainless or steel outdoor art and architectural elements.
- Wood (hardwoods, engineered blocks)
- Better for indoor display only.
- Warm, rich look for homes, galleries, or lobbies.
- Needs sealing and regular care to avoid warping and moisture damage.
I match base material to:
- Location: indoor vs outdoor
- Climate: freeze/thaw, humidity, coastal air
- Style: traditional, contemporary, or industrial
Drilling, Pinning, and Bolting to the Base
To attach the bronze sculpture securely to its base, I use a combination of drilling, pinning, and bolting:
Typical setup:
- Drill holes in the base to match the stainless pins coming from the sculpture.
- Set pins with epoxy or non-shrink grout inside the base holes.
- Use hidden nuts and washers inside access points when the sculpture allows interior access.
- For public or outdoor locations, I favor permanent or tamper-resistant fasteners so the sculpture can’t be easily removed.
Key points:
- Holes are drilled slightly oversize to allow for fine alignment.
- I dry-fit everything first to check level, plumb, and orientation.
- Once aligned, the assembly is locked in place with structural adhesive or grout.
Balance, Weight, and Stability
Safety is non-negotiable. I always evaluate:
- Center of gravity: The sculpture should never feel “tippy.”
- Footprint vs height: Tall, narrow pieces need a wider, heavier base.
- Expected interaction: People will touch, lean, sometimes climb—especially in public parks.
To maintain stability, I:
- Increase base thickness or footprint for tall or dynamic poses.
- Use internal ballast or thicker stone for heavy pieces.
- Check risk points: extended arms, thin support points, or off-center poses.
Outdoor Installation Considerations
Outdoor bronze sculpture in the U.S. has to handle wind, vandalism, and weather:
- Wind loads
- I work with the site engineer when needed, especially for large or elevated installations.
- The base and anchors must handle gusts typical to the region.
- Vandalism and security
- Use hidden or tamper-proof fasteners.
- Design bases with limited footholds to discourage climbing.
- For high-risk areas, I may recommend heavier bases and deeper anchors into concrete.
- Weather and drainage
- Ensure water can drain away from the base and sculpture feet.
- Avoid standing water pockets that speed corrosion and stain stone.
- Use sealers suitable for stone or concrete in freeze–thaw zones.
For outdoor environments, I design installations to work alongside other durable metal or steel outdoor sculptures similar to those described in this overview of long-lasting outdoor steel art.
Transporting and Installing Large Bronze Statues
Large bronze statues require professional handling. Here’s how I usually manage it:
- Crating and protection
- Custom-built crates or frames
- Protective wrapping on high-detail areas
- Clear labeling of lifting points and center of gravity
- On-site equipment
- Forklifts, cranes, or boom trucks sized to the sculpture and site restrictions
- Spreader bars and soft straps to avoid damaging the bronze surface
- Installation sequence
- Set and level the base first.
- Position the sculpture using designated lifting points.
- Align pins with pre-drilled holes, then set with epoxy or grout.
- Final torque check on all bolts and fasteners.
- Final inspection
- Confirm stability with a gentle load test.
- Check joints, seams, and base edges for gaps.
- Clean fingerprints, dust, and marks from transport.
When I deliver a custom bronze sculpture, my goal is simple: once it’s mounted and installed, it should be solid, safe, and ready to live there for decades with minimal maintenance.
DIY Bronze Casting vs Professional Foundry
If you’re asking “how do you make a bronze sculpture” and you live in the U.S., you’re probably also asking: can I really cast bronze myself, or should I hire a professional bronze casting foundry?
Here’s the honest breakdown.
What You Can Realistically Do at Home or in a Small Studio
At home or in a small studio, you can safely handle all the “cold” and lower‑risk steps:
- Design and sculpt the original in clay or digital
- Make silicone or plaster molds for lost wax casting
- Cast wax positives and do basic wax chasing
- Build small investment molds (for very small bronze pieces)
- Do light finishing and patina on small, pre‑cast bronzes
You can sometimes melt and pour small amounts of bronze (jewelry scale or tiny objects) if you have:
- A small furnace or kiln
- Proper ventilation
- Fireproof work area
- Serious safety gear
But for anything bigger than a small handheld piece, home casting quickly becomes unsafe and expensive.
Equipment and Safety Limits of DIY Bronze Casting
Bronze sculpture step by step sounds simple, but the real bottleneck is molten metal and heat management.
To cast bronze safely, you need:
- A furnace that can reach 1100–1200°C (2000–2200°F)
- Suitable crucibles and lifting/pouring tools
- Fireproof foundry floor and walls
- Proper ventilation and exhaust
- Full metal casting safety gear:
- Face shield + safety glasses
- Flame‑resistant clothing
- Leather apron and boots
- High‑temp gloves and hearing protection
- Space to handle spills, splashes, and hot shells
In most U.S. homes and small studios, the risk of fire, burns, and toxic fumes is too high for serious bronze casting. That’s why most artists here design and do their clay/wax work themselves, then send it to a professional foundry.
When It Makes Sense to Use a Professional Bronze Foundry
Bringing in a professional art foundry is the smart move when:
- Your bronze sculpture is larger than your hand
- You want museum‑quality or gallery‑ready results
- You need multiple editions of the same piece
- The project will live outdoors long‑term
- You’re working on a public art or commercial commission
- You’re on a deadline and can’t afford mistakes
A good foundry already has:
- Industrial furnaces, ceramic shell equipment, and burnout kilns
- Experienced technicians for wax chasing, sprue system design, and metal pouring
- Professional TIG welders and metal chasers
- Patina specialists who can control color and finish
For example, a dedicated casting bronze sculpture foundry can handle large custom bronze sculptures, manage complex sprue systems, and ensure consistent results across an entire edition.
How a Professional Art Foundry Handles the Process
In a professional bronze casting foundry, the bronze statue making process usually looks like this:
- Review
- They review your clay, digital file, or existing model.
- They discuss size, edition, alloy (silicon bronze, statuary bronze), and patina.
- Mold & Wax
- They create production molds.
- Cast and chase wax positives.
- Design the sprue system for clean metal flow.
- Investment & Burnout
- Build ceramic shell investment.
- Burn out the wax at controlled temperatures.
- Metal
- Melt bronze to the correct bronze pouring temperature.
- Pour, cool, and break the shell.
- Metal Chasing & Welding
- Grind, chase, and TIG weld sections.
- Rebuild textures and clean the surface.
- Patina & Finish
- Apply hot or cold patinas.
- Seal with wax or lacquer and prep for shipping and installation.
You get professional oversight at every step, which is difficult (and costly) to replicate in a home setup.
Working From Digital Design to Finished Patina
If you’re working digitally in ZBrush, Blender, or similar, a modern bronze casting foundry can:
- Help optimize your file for 3D printing
- Print the piece at full or scaled size
- Clean and refine the print
- Make molds, wax positives, and build ceramic shell investment
- Handle casting, metal chasing, and final patina
This “clay to bronze sculpture” workflow is ideal if you:
- Prefer digital sculpting
- Need precise symmetry and detail
- Want to scale your design up or down
Typical Timelines and Communication
For U.S. clients, typical timelines for a custom bronze sculpture are:
- Small piece (tabletop): ~6–10 weeks
- Medium (2–4 ft): ~10–16 weeks
- Large statue or public piece: ~4–9 months, depending on complexity
Expect regular check‑ins for:
- Mold approval (sometimes photos or videos)
- Wax approval, especially for important details
- Patina samples or color tests
- Shipping/installation scheduling
A good foundry will keep communication clear and simple so there are no surprises on cost, schedule, or final look.
What to Prepare Before Contacting a Bronze Sculpture Foundry
To get accurate quotes and smooth production, have these ready:
- Design references
- Photos, sketches, 3D renderings, or images of similar sculptures
- Scale and dimensions
- Final size (height, width, depth)
- Indoor or outdoor installation
- Material and finish
- Preferred bronze alloy (commonly silicon bronze for sculpture)
- Patina color (brown, black, verdigris, etc.)
- Finish level: matte, satin, or glossy
- Quantity
- One‑off or limited edition (how many casts?)
- Budget range
- Even a rough range helps the foundry guide you to the right options.
- Timeline
- Hard deadlines (gallery opening, installation date, unveiling, etc.)
- Files or originals
- Clay original, 3D files (STL/OBJ), or 3D prints
If you’re looking at larger or more complex metal projects, you can also compare bronze options with other materials like stainless steel by reviewing pieces such as this mirror-polished stainless steel dragon sculpture.
Bottom Line
- DIY bronze casting is possible only at very small scale and with serious safety measures.
- For custom bronze sculpture that’s larger, public‑facing, or high value, a professional foundry is the safest, most cost‑effective path.
- Go in prepared—with clear designs, size, finish, and timeline—and you’ll get better quotes, smoother production, and a final bronze sculpture that actually matches your vision.
Common Questions About How To Make a Bronze Sculpture
I’ll keep this tight and practical so you can quickly see what’s realistic for your project.
How long does it take to make a bronze sculpture?
It depends on size, detail, and whether we cast in-house or through a professional bronze casting foundry.
Typical timelines:
| Sculpture Size / Complexity | Approx. Timeline* |
|---|---|
| Small (tabletop bust, simple pose) | 4–8 weeks |
| Medium (2–3 ft, moderate detail) | 2–4 months |
| Large (life-size, complex forms) | 4–8 months |
| Monumental (public statue) | 6–18+ months |
*Includes clay to bronze sculpture, casting, chasing, and patina. Tight deadlines are possible but usually cost more.
What affects the cost of a custom bronze sculpture?
Cost is driven by materials, labor, and complexity. For US clients, here are the main levers:
Key cost factors:
- Size & weight – More bronze = more cost (metal + shipping + installation).
- Detail level – Fine textures and realism require more sculpting and metal chasing time.
- Edition size – Larger editions lower cost per piece.
- Foundry rates – US foundries cost more than overseas; some clients combine US design with international casting.
- Engineering & installation – Structural steel, bases, and site work add up, especially for large outdoor pieces.
- Patina & finish – Complex, layered patinas and custom color work take more time.
Simple rule: the bigger and more detailed the statue, the higher the mold, metal, and labor cost.
Can you make a bronze sculpture at home safely?
You can do parts of the process at home, but full hot bronze casting is serious industrial work.
Reasonable to do at home:
- Clay sculpting
- Wax modeling and basic wax chasing
- Designing the sprue system (with guidance)
- Small cold-cast “bronze” resin pieces
Risky to do at home:
- Melting bronze at 2000–2200°F (1100–1200°C)
- Ceramic shell burnout in a large kiln
- Pouring molten metal
For full hot-cast bronze, I strongly recommend using a professional art foundry. They have the furnaces, shell rooms, lifting equipment, and safety gear to handle molten metal correctly.
Hot-cast bronze vs cold-cast “bronze” resin
These two get confused a lot. They are not the same.
| Feature | Hot-Cast Bronze (Real Bronze) | Cold-Cast “Bronze” Resin |
|---|---|---|
| Material | Solid bronze alloy | Resin + bronze powder on top or mixed in |
| Process | Lost-wax casting, molten metal | Molded at room temperature |
| Weight | Heavy, dense | Much lighter |
| Durability (outdoor) | Excellent, centuries with proper care | Limited; can fade or crack over time |
| Value | High fine-art value, collectible | More decorative, lower long-term value |
| Repair & restoration | Weldable, refinishable | Harder to restore invisibly |
If you’re commissioning a custom bronze sculpture for serious long-term use (public art, heirloom, or collection), go with hot-cast bronze.
Why is the lost-wax casting process still used?
The lost wax casting process is thousands of years old, and we still rely on it because it works incredibly well for detail and quality.
Why it’s still the standard:
- Precision: Captures fingerprints, skin pores, hair texture, and subtle clay marks.
- Flexibility: Works for small figurines up to monumental statues.
- Reproducibility: Once the mold exists, we can create multiple identical castings.
- Strength: The ceramic shell investment handles high temperatures and pressure from molten bronze.
- Artistic control: Sculptors and foundries can adjust thickness, sprue system design, and patina to dial in the final look and structure.
Modern foundries have added better alloys, kilns, and safety gear, but the core method remains the same because it’s that effective.
How do clay, wax, and metal affect the final quality?
Each stage leaves its mark on the bronze statue making process.
Clay (original sculpture):
- Sets the overall form, anatomy, and gesture.
- Any mistake in clay will carry through unless fixed later in wax or metal.
- Best place to solve composition and silhouette.
Wax (wax positive casting):
- Ideal for refining sharp edges and fine details.
- Wax chasing techniques fix seams, bubbles, and small flaws.
- Sprue system design happens here, which affects how well the silicon bronze alloy or statuary bronze fills the mold.
Metal (final bronze):
- Brings strength and permanence.
- Bronze metal chasing and TIG welding clean up joints, seams, and cast-in defects.
- Surface prep and patina techniques define the final color, depth, and feel of the sculpture.
If you want to see how bronze compares to other metals in art, it’s helpful to look at how studios use materials like iron in modern sculpture, similar to what’s done in some contemporary iron sculpture projects.
If you’re in the US and considering a custom bronze sculpture—whether it’s a small commemorative piece or a large public work—the smartest move is usually: clay and design with the artist, then casting and patina through a trusted professional foundry for safety, consistency, and long-term durability.


Add a Comment